 i was compelled to use up the leftover custard and starter dough from the last bamboo charcoal custard bread that i made…. i don’t like to waste food, and decided to use up the entire 73g of starter dough that i had in the fridge…. i like to make a really soft bun, so no harm adding all of the starter dough and see how the texture turns out
Ingredients
100g bread flour
25g cake flour
25g sugar
2g salt
2g instant dry yeast
50g milk
35g unsalted butter (softened)
19g egg + 1 egg yolk
*73g starter dough
filling
homemade custard (or any desired filling)
Directions
 – mix all ingredients of starter dough and leave it to rise at 26 degrees C for 3 hours. You can do this the night before baking but please chill the starter dough
– mix all ingredients of main dough (except butter) and knead till it is no longer sticky
– add in butter and continue kneading till you achieve window pane stage
– first proofing: proof dough for 30-40 mins at room temperature of 26 degrees celsius
– gently punch dough down and divide into desired portions
– rest dough for 30mins at room temperature of 26 degrees celsius
– after resting, flatten dough and wrap custard filling into dough. seal seams
– second proofing: proof all dough for 30-40mins at room temperature of 26 degrees celsius
– preheat oven to 240 degrees C
– once proofed, egg wash buns and bake for 15-18 mins
Personal notes:
 – i used trehalose sugar in place of granulated sugar
– each of my bun is 50g. i made six 60g buns and one 30g bun. filling for buns are half the weight of the dough
– i used the egg from the leftover egg from dough recipe and added 1tsp of water
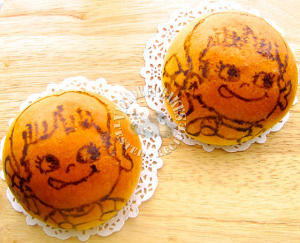
– if you are going to paint your buns, please ensure you do not over-brush your buns with egg wash; otherwise your painting will start to smudge
– my buns were baked for 15mins in a 180 degrees C preheated oven
 verdict? the buns are extremely soft…. next time, i will push my limit, and add more liquid |ω・)
Pollution index: (fantastic in Hong Kong)


Hi Vic,
This buns are so cute. I bet they taste wonderful.
mui
thanks mui
Kudos to you, Victoria! You have already pushed your limited with all these hand-painting. How do you feel eating these buns? I would hesitate a lot to have my first bite… didn\’t want these cute drawings to be munched :p
Zoe
thanks Zoe…. i love these buns… yes, feel a little wrenched when biting.. but to my hubby, he don\’t seem to notice them… just a few strokes of chocolate painting here and there….
oh these are so cute. Sure will be a hot favourite with kids. BTW, how do you draw them?
Hi Edith, u need to mix some cocoa powder with an egg yolk. It\’s difficult to tell u how much cocoa powder is needed but definitely more than one tsp.this really depends how big ur yolk is. Mix it well and let it drip down from your brush to check consistency. If it drips too fast, then it is too wet for drawing and will smudge. Then add more cocoa powder. U want to add cocoa powder very slowly as if the mixture gets too thick, then it is difficult to draw… It\’s a bit like adding water to your painting colour before u paint…. Hope this helps and enjoy personalizing your own buns 🙂
So it is to draw after 2nd proof or during the 2nd proofing?
Hi Edith, i realised the best time to draw, is midtime during 2nd proof (if you draw after second proof, the rest of the buns continue to rise till they are so huge and get sticky). so, second proof being 40 mins, i will draw them around 20mins into proofing time (just as i begin to preheat oven). It depends on how complicated your drawing is… i take a long time to complete one drawing, that\’s why 20 mins is just nice… if you are writing simple words, then maybe 30 mins into proofing time, u can start drawing. Remember if you are using egg wash, you must make sure there is not too much excessive eggwash on bread. otherwise, your painting will smudge… have fun and look forward to your post! 🙂