 after dear esther made this cake, i was totally mesmerised.. and then i realised i’d also bookmarked the same from blue little kitchen and mui mui (the original recipe contributor)…so here’s mine
网上看见 esther 家的作品后,傻了眼。。美。。然后。。更傻了眼 ~发现原来较早前既然也在蓝色小厨和 mui mui 家(原食谱贡献者)也收藏了同样的食谱。。。它。。既然被偶埋藏到清单的深、深、深处。。。
Recipe adapted from the above friends, with modifications
Ingredients (i used a 6 inch square pan, with removable base)
(A)
227g butter
(B)
5 eggs
(C)
125g condensed milk
125g kaya
(D)
135g cake flour
100g horlicks
(E) mix the following together and set aside
3 tsp instant coffee powder
1 tsp cocoa powder
1.5 tbsp warm water
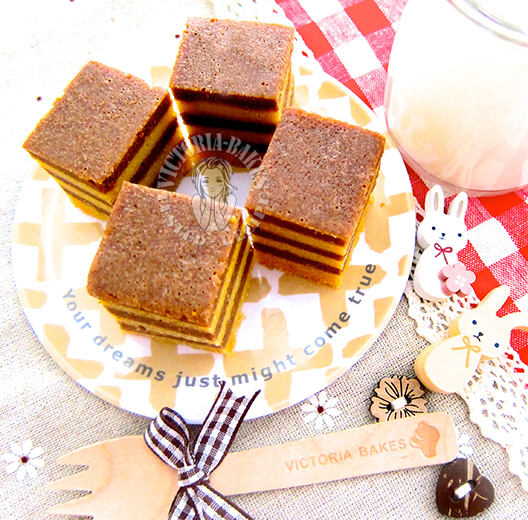 食材(我用了6寸方形活动底烤盘)
(A)
黄油 227克
(B)
鸡蛋 5颗
(C)
炼奶 125克
咖椰 125克
(D)
蛋糕粉 135克
好力克 100克
(E)以下食材混合、待用
即溶咖啡粉 3小匙
可可粉 1小匙
温水 1.5大匙
Directions/做法
 – grease pan and line bottom with parchment paper
烤盘抹油、底部铺上烘焙纸
– beat A till pale and fluffy. add in B, one egg at a time and blend well
将 A打至发白、蓬松。加入 B。鸡蛋每加入一颗拌匀后再加入下一颗
– add in C and D, beat till well combined
拌入 C和 D,拌匀
– divide batter into two portions. add (E) into one portion, and keep the other plain
面糊分成两份,其中一份加入(E),拌匀。另一份保持原味
– alternate batter into pan (c. 140g per layer) and steam each layer on high heat for 8-9 mins (most importantly is for the top to firm up before adding a next layer). do not steam for too long as the surface will wrinkle up and cause uneven layers
面糊以交替方式,轮流倒入烤盘以大火蒸 8-9分钟(每层约 140克~最主要是加入下一层面糊时,之前那层不应该是湿答答滴)。注:每层不可蒸太长时间,否则顶部会起皱纹

This post is linked to the event, Little Thumbs up: Cocoa organised by Doreen from my little favourite DIY and Zoe, Bake for Happy Kids, hosted by Grace from Life can be simple at this post
 and
and
Cook and Celebrate: CNY 2015 organised by Yen from Eat your heart out, Diana from Domestic Goddess Wannabe and Zoe, Bake for Happy Kids

Pollution index: 335 (severely polluted)


Is there a reason for steaming this rather than baking it? Can I bake it instead?
Hi ~ some people prefer steaming for health purposes. i have not tried baking these, but don\’t see a reason why you cannot grill these (remember that baking lapis is always using grill mode). hope this helps and thanks for coming by
Thank you. Will probably give baking a try. 🙂
May I ask what size of square baking tin did you use? The cake looks good. ☺
hello max, you may have missed this (as mentioned in the ingredients portion ;))
i used a 6 inch square pan with removable bottom base. hope this helps and have a good CNY
哇!好漂亮的千层蛋糕!
一层一层的蒸,一定要有耐心呢!你很棒哦!
My dear, 不用傻眼了!现在做也不迟啦!你的蛋糕一层层,整整齐齐的,美呆了!
对了,我今天才知道原来你家的Best recipe~My homemade cookies昨天落幕了。
今天还傻傻要把帖子链接去家呀,哈哈哈!
做过这个 我还蛮喜欢的
哈哈
新年快乐
亲, 你的千层蛋糕做的出神入化了, 个个都是那么整齐完美!
这次还让我傻眼了,呆了几分钟了! 嘻嘻。。
再次祝亲亲你新年快乐, 天天美丽哦!
Noticed some of your cookies uses potato starch. Is it the same as potato flour?
Hi Wendy, apologies for missing this. No,.potato starch n flour are two separate things.
Hi Victoria,
Interesting that baking hermit asked if we can bake this cake instead of steaming??? I wonder if there is any differences too… Nevertheless, the streamed version look really good.
Zoe
现在换我bookmark,然后等哪天也傻乐了,才来玩这个。
这里也祝福亲爱的你,幸福安康,新年快乐。
Hi Vic,
祝你新年快乐,洋洋得意!
Thanks for sharing my favorite steam cake to LTU 🙂
Oh..I am craving for it now.
Thanks again for the shout out!
mui